- For how to change some text options in-game, see Options screen.
This page describes various message options, including modifying the appearance of text and the message box, and displaying choices.
Messages
A message is any text which appears in a box, either by an event's "Show Text" command or by the method Kernel.pbMessage or any of a number of similar methods.
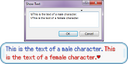
There are two kinds of messages: speech and system. Speech is for any text that appears as dialogue, while system is typically for choice menus and informative text.
When typing a message into an event, you do not need to add in any line breaks or restrict how much text you enter. The message system will automatically wrap text as appropriate, and scroll the text if it won't all fit into a single text box.
Windowskins

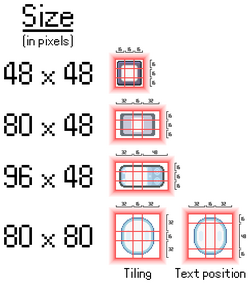
Diagram showing the margins for each style of windowskin.
A windowskin is the background image of the message box. All windowskins are stored in the folder "Graphics/Windowskins".
Each windowskin is a single graphic of specific dimensions. The graphic's dimensions determine which margins it should use to split itself up when displaying as a proper message box. The image on the right shows how windowskins of different sizes are divided up.
A windowskin has two kinds of margins:
- "Tiling" - This is how the graphic itself is drawn to fill the area of the screen it should occupy. The four middle side segments and the central segment are tiled as often as necessary.
- "Text position" - The central segment defined by these margins is where the text is displayed.
Only one of the four styles of windowskin has different tiling and text position margins.
Pokémon Essentials also supports windowskins in the forms used by RPG Maker XP (192x128) and RPG Maker VX (128x128). Information about those formats can be found online.
The player is able to change the windowskins of the speech and system messages in the Options screen.
Special windowskins
There are a couple of notable windowskins. These are:
- goldskin.png - Used for the boxes which show the player's money and Coins.
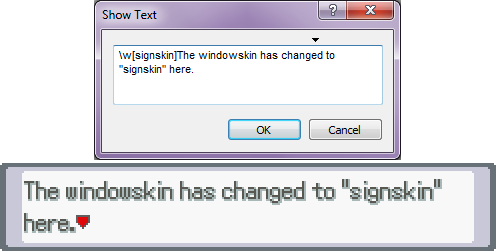
- signskin.png - Typically used for signposts and "Trainer Tips" boards.
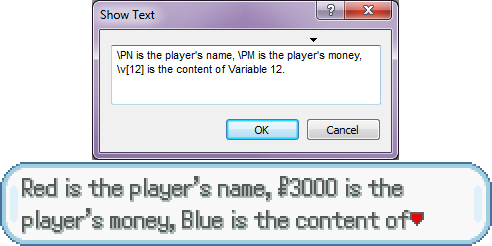
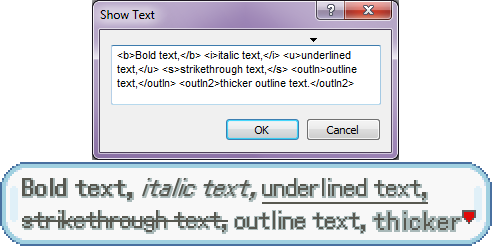
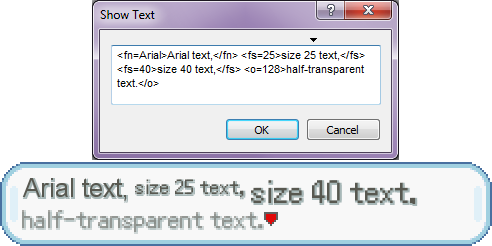
Modifying text
These are a number of ways to modify the text in Pokémon Essentials. You can do so by using the following commands:


| Command | What it does | Screenshot |
|---|---|---|
\ts[X]
|
Sets the display speed of the text to the value "X". If "X" is blank (i.e. \ts[]), the text displays instantly. The higher the number, the slower the text is displayed.
|
n/a |
\1
|
Pauses the message. When the player presses a button, the message will carry on being shown.
If you're showing several messages in a row via code (e.g. with |
n/a |
\.
|
Pauses the message for 1/4 of a second, then automatically continues to show the rest of the text | n/a |
| Pauses the message for 1 second, then automatically continues to show the rest of the text | n/a | |
\wt[X]
|
Pauses the message for X/20 of a second, then automatically continues to show the rest of the text.
|
n/a |
\wtnp[X]
|
Pauses the message for X/20 of a second, then automatically continues to show the rest of the text. The message closes immediately when it is done.
|
n/a |
| Command | What it does | Screenshot |
|---|---|---|
\se[X]
|
Plays the sound effect (SE) named "X".
|
n/a |
\me[X]
|
Plays the music effect (ME) named "X".
|
n/a |
| Command | What it does | Screenshot |
|---|---|---|
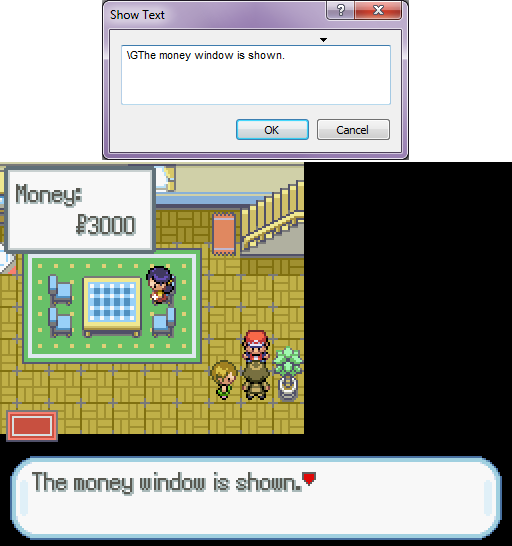
\G
|
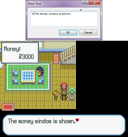
Displays a separate window showing the player's current money, at the top left of the screen only while the current message is being displayed. This window is displayed by def pbDisplayGoldWindow in the script section Messages.
|
  |
\CN
|
Displays a separate window showing the player's current Coins, at the top left of the screen only while the current message is being displayed. This window is displayed by def pbDisplayCoinsWindow in the script section Messages.
It can be shown alongside the money window, but if so, this command must appear after the money window's command (e.g. |
  |
\f[X]
|
Displays the picture called "X.png", located in the folder "Graphics/Pictures". | 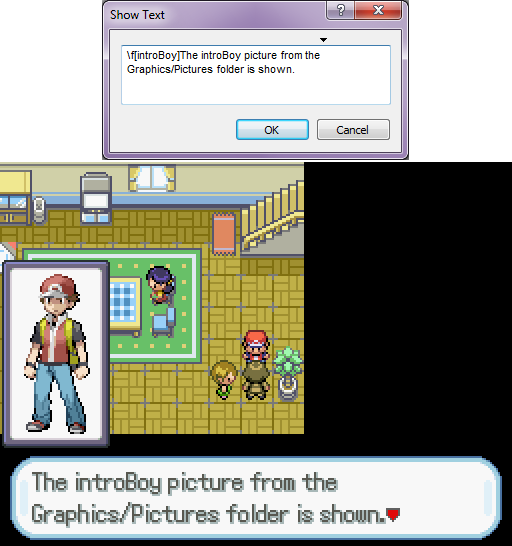  |
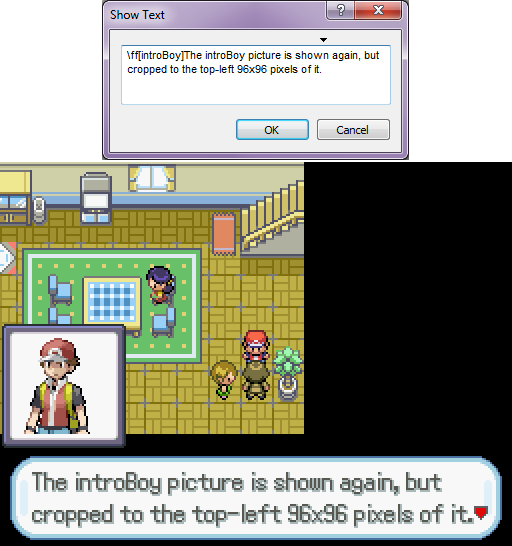
\ff[X]\ff[X,2]
|
Displays a 96x96 pixel square of the picture called "X.gif" or "X.png", located in the folder "Graphics/Faces" (or "Graphics/Pictures" if not found).
The number is optional, is 0 by default, and indicates which part of the picture to show. The picture is considered to be a 4x4 grid of squares, starting with square 0 being the top left one and counting across and then down (e.g. square 7 is the far right square of the second row). This command works with animated gifs. |
  |
<icon=X>
|
Displays the icon called "X.png" in the folder "Graphics/Icons". This icon appears in-line in the text. | 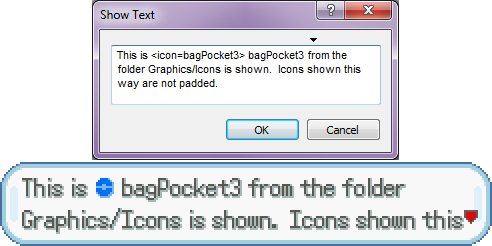  |
\ch[a,b,choices]
|
Displays a list of choices. See below for more information. |
When using a message command, you should not put any spaces around it as you would a word. For example, you should write "\bText" rather than "\b Text".
Choices
RPG Maker XP has an event command called "Show Choices", which is useful so long as there are no more than four options to choose from. To show a choice of more than four options, you will need to use a message command instead.
You can display a list of choices by using the message command \ch[a,b,choices], where:
- "
a" is the number of a Game Variable in which to store the chosen choice (the first choice is 0, the second is 1, and so on). - "
b" is the choice used when the player cancels (or 0 if the player can't cancel or -1 if you don't want to choose any of the displayed options). Here, the first choice is 1, the second is 2, and so on. - "
choices" is a comma-separated list of choices.
Examples
\ch[5,1,Choice 1,Choice 2,Choice 3,Choice 4]
This example displays four choices, stores the chosen choice in Game Variable 5, and specifies that "Choice 1" will be chosen if the player cancels. Game Variable 5 will store the number 0 if "Choice 1" is chosen, the number 1 if "Choice 2" is chosen, and so on.
\ch[5,0,Choice 1,Choice 2,Choice 3,Choice 4,Choice 5]
This example displays five choices, stores the chosen choice in Game Variable 5, and specifies that the player must make a choice (i.e. they cannot cancel).
\ch[5,-1,Choice 1,Choice 2,Choice 3,Choice 4,Choice 5]
This example displays five choices, stores the chosen choice in Game Variable 5, and specifies that none of the given choices will be chosen if the player cancels.
Below is a complete example that shows how an event can do different things depending on the choice the player chose. Note the Conditional Branches that check the value of the stored result.
@>Comment: Store result in Variable 1.
         : Cancelling stores a result of -1.
@>Text: Please choose one.\ch[1,-1,Choice 1,Choice 2]
@>Conditional Branch: Variable [0001: Temp Pokemon Choice] == -1
  @>Text: The choice was cancelled.
  @>
 : Branch End
@>Conditional Branch: Variable [0001: Temp Pokemon Choice] == 0
  @>Text: Choice 1 was chosen.
  @>
 : Branch End
@>Conditional Branch: Variable [0001: Temp Pokemon Choice] == 1
  @>Text: Choice 2 was chosen.
  @>
 : Branch End
@>
In the following example, the player must make a choice:
@>Comment: Store result in Variable 1.
         : Can't cancel.
@>Text: Please choose one.\ch[1,0,Choice 1,Choice 2]
@>Conditional Branch: Variable [0001: Temp Pokemon Choice] == 0
  @>Text: Choice 1 was chosen.
  @>
 : Branch End
@>Conditional Branch: Variable [0001: Temp Pokemon Choice] == 1
  @>Text: Choice 2 was chosen.
  @>
 : Branch End
@>
Entering text
The player can provide text for the game to use. There are two different kinds of text entry. This section only describes how to get text from the player; it does not describe what you can do with it.
Entering a word/name
This method lets the player enter a short name. It is used for naming the player character (and rivals), giving a Pokémon a nickname, and naming a Pokémon storage box. This is done via the naming screen.
There are two versions of the naming screen - cursor entry and keyboard entry. Which one is used by a game depends on an option in the Options screen. The cursor entry version is identical to text entry in the official games, where you are provided with a grid of letters, numbers and symbols to select and insert into the name. The keyboard entry version takes advantage of Essentials games being PC games, and allows direct text entry by typing it in via the keyboard.
Entering a word is done by using the following code:
name=pbEnterText(_INTL("Your name?"),0,7,_INTL("Red"))
The first parameter is the "helper text", a phrase which appears in the naming screen and lets the player know what they're supposed to be entering a name for.
The second parameter is the minimum length that the name can be. If this is 0, the naming can be cancelled (and namewill be set to ""). The third parameter is the maximum length that the name can be, and is traditionally 7 characters for player names and 10 characters for Pokémon nicknames.
The fourth parameter is optional, and is the default name which the player can edit/replace.
Variants
There are three variants of pbEnterText, which are used to give names to specific things. The difference is that they display an icon of the thing being named.
None of these variants need to be manually used by you. The scripts automatically use these variants where appropriate, and it is highly unlikely you would ever want to use them manually. They are mentioned here for the sake of completeness.
pbEnterPlayerName(_INTL("Your name?"),0,7,_INTL("Red"))
This specifically is for naming the player. It shows the player's south-facing overworld image, animated and walking on the spot. Its parameters are the same as for pbEnterText.
pbEnterPokemonName(_INTL("Nickname?"),0,10,"",pokemon)
This specifically is for naming a Pokémon. It shows the Pokémon's animated icon, along with its gender symbol if it has a gender. Its parameters are the same as for pbEnterText, except for the addition of one at the end, which is a Pokémon object.
pbEnterBoxName(_INTL("Box name?"),0,12,"BOX 1")
This specifically is for naming a Pokémon storage box. It shows an animated icon that represents a storage box. Its parameters are the same as for pbEnterText.
Entering a message
This method lets the player enter a longer message. It is used for writing a message in a mail item when giving it to a Pokémon.
Unlike naming something, entering a message does not involve a separate screen. Instead, a message box appears on-screen which the player can type into using the keyboard.
Message entry is done by using the following code:
message=Kernel.pbMessageFreeText(_INTL("Please enter a message."),
                                 _INTL("Default message."),
                                 false,256,Graphics.width)
The first parameter is the "helper text", a phrase which appears to let the player know what they're supposed to be doing.
The second parameter is the default message. If you don't want a default message, simply put "" here instead.
The third parameter is whether the message is a password. If this is true, then the message is shown as asterisks instead of actual letters. If this is false, then the message is shown as normal.
The fourth parameter is the maximum length that the message can be.
The fifth parameter is optional, and is the width of the message entry box. If this is blank, the width will be 240 pixels (just under half the width of the screen). Graphics.width is the entire width of the screen.
Note that message entry can be cancelled. In that case, message will be set to "".